Developer Guide
- Acknowledgements
- Setting up, getting started
- Design
- Implementation
- Documentation, logging, testing, configuration, dev-ops
- Appendix: Requirements
-
Appendix: Instructions for manual testing
- Launch and shutdown
- Adding an employee
- Deleting an employee
- Incrementing salaries of multiple employees
- Undoing a modification
- Redoing the previous undone command
- Editing an employee
- Sorting the list
- Finding an employee
- Viewing command history
- Exporting data file
- Importing data file
- Viewing help window
-
Appendix: Planned Enhancements
- 1. Export command FILE_NAME should be a non-empty String
- 2. Allow the use of prefixes in name field
- 3. Change all mentions of addressbook to employeemanager
- 4. Stringent email validation
- 5. Improve clarity of success message for
undocommands - 6. Improve clarity of success message for
redocommands - 7. Enhance validation for
sortcommand - 8. Enhance error message for
editcommand - 9. Increase support for a broader range of display compatibility
- 10. Allow
sortto be case-insensitive
- Appendix: Effort
Acknowledgements
-
Some code adapted from Marco Jakob’s JavaFX Tutorial
-
Some code inspired by SE-EDU AddressBook Level 4
- Copyright by Susumu Yoshida - Mcdodesign
address_book_32.png
- Copyright by Jan Jan Kovařík - Glyphicons
calendar.png
- Icons in our project are sourced from Google fonts
Setting up, getting started
Refer to the guide Setting up and getting started.
Design
.puml files used to create diagrams in this document docs/diagrams folder. Refer to the PlantUML Tutorial at se-edu/guides to learn how to create and edit diagrams.
Architecture
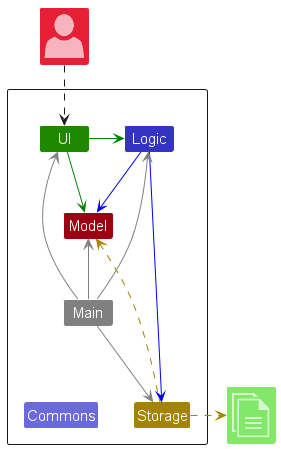
The Architecture Diagram given above explains the high-level design of the App.
Given below is a quick overview of main components and how they interact with each other.
Main components of the architecture
Main (consisting of classes Main and MainApp) is in charge of the app launch and shut down.
- At app launch, it initializes the other components in the correct sequence, and connects them up with each other.
- At shut down, it shuts down the other components and invokes cleanup methods where necessary.
The bulk of the app’s work is done by the following four components:
-
UI: The UI of the App. -
Logic: The command executor. -
Model: Holds the data of the App in memory. -
Storage: Reads data from, and writes data to, the hard disk.
Commons represents a collection of classes used by multiple other components.
How the architecture components interact with each other
The Sequence Diagram below shows how the components interact with each other for the scenario where the user issues the command delete 1.
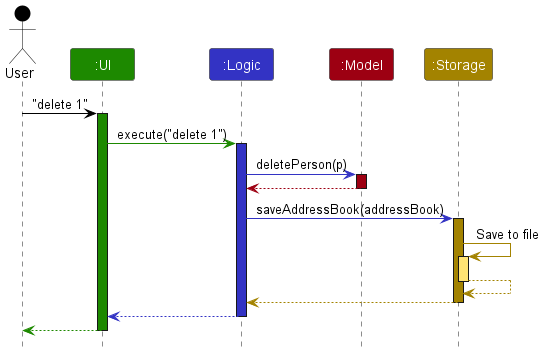
Each of the four main components (also shown in the diagram above),
- defines its API in an
interfacewith the same name as the Component. - implements its functionality using a concrete
{Component Name}Managerclass (which follows the corresponding APIinterfacementioned in the previous point).
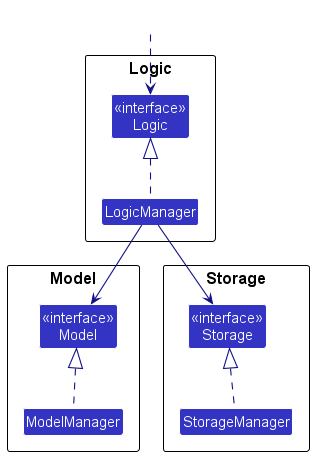
For example, the Logic component defines its API in the Logic.java interface and implements its functionality using the LogicManager.java class which follows the Logic interface. Other components interact with a given component through its interface rather than the concrete class (reason: to prevent outside component’s being coupled to the implementation of a component), as illustrated in the (partial) class diagram below.
The sections below give more details of each component.
UI component
The API of this component is specified in Ui.java
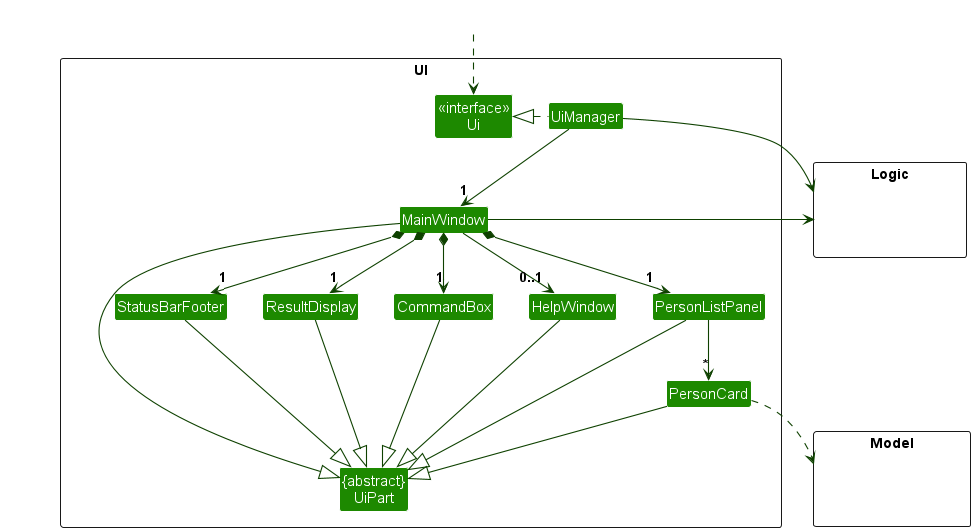
The UI consists of a MainWindow that is made up of parts e.g.CommandBox, ResultDisplay, PersonListPanel, StatusBarFooter etc. All these, including the MainWindow, inherit from the abstract UiPart class which captures the commonalities between classes that represent parts of the visible GUI.
The UI component uses the JavaFx UI framework. The layout of these UI parts are defined in matching .fxml files that are in the src/main/resources/view folder. For example, the layout of the MainWindow is specified in MainWindow.fxml
The UI component,
- executes user commands using the
Logiccomponent. - listens for changes to
Modeldata so that the UI can be updated with the modified data. - keeps a reference to the
Logiccomponent, because theUIrelies on theLogicto execute commands. - depends on some classes in the
Modelcomponent, as it displaysPersonobject residing in theModel.
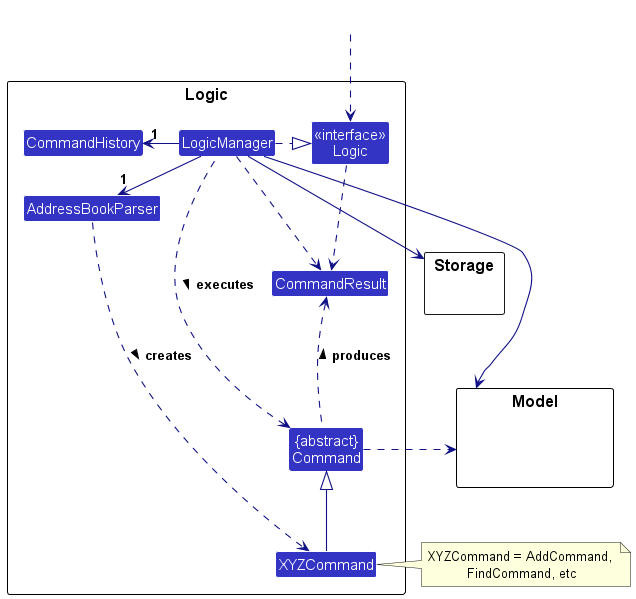
Logic component
API : Logic.java
Here’s a (partial) class diagram of the Logic component:
The sequence diagram below illustrates the interactions within the Logic component, taking execute("delete 1") API call as an example.
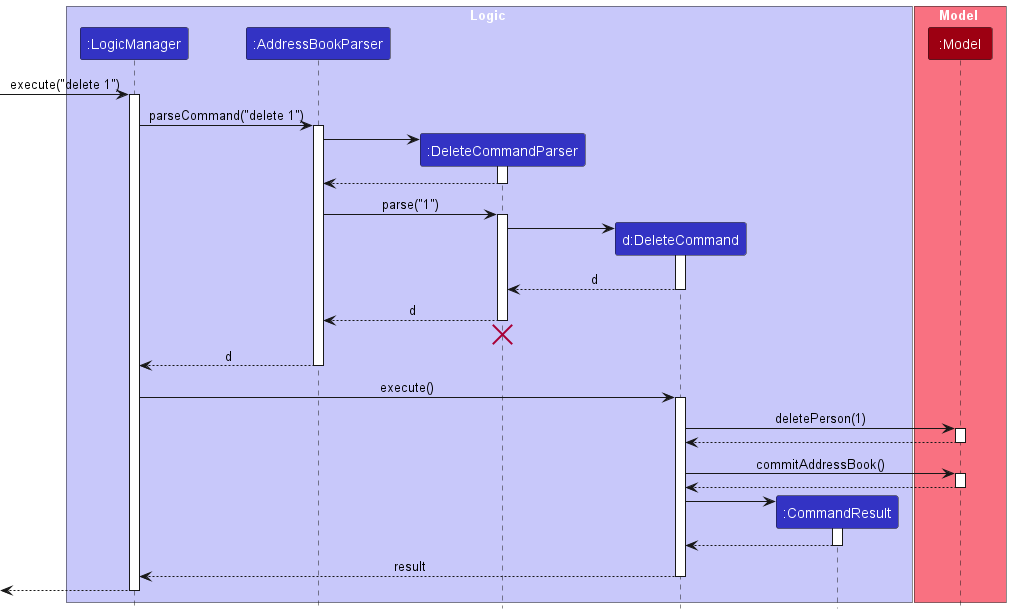
DeleteCommandParser should end at the destroy marker (X) but due to a limitation of PlantUML, the lifeline reaches the end of diagram.
How the Logic component works:
- When
Logicis called upon to execute a command, it is passed to anAddressBookParserobject which in turn creates a parser that matches the command (e.g.,DeleteCommandParser) and uses it to parse the command. - This results in a
Commandobject (more precisely, an object of one of its subclasses e.g.,DeleteCommand) which is executed by theLogicManager. - The command can communicate with the
Modelwhen it is executed (e.g. to delete a person and to commit the current state of the addressbook to be used forundoandredocommands). - The result of the command execution is encapsulated as a
CommandResultobject which is returned back fromLogic.
Here are the other classes in Logic (omitted from the class diagram above) that are used for parsing a user command:
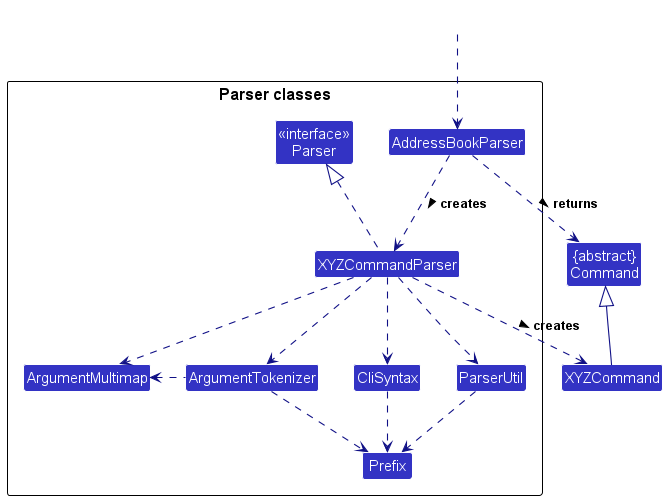
How the parsing works:
- When called upon to parse a user command, the
AddressBookParserclass creates anXYZCommandParser(XYZis a placeholder for the specific command name e.g.,AddCommandParser) which uses the other classes shown above to parse the user command and create aXYZCommandobject (e.g.,AddCommand) which theAddressBookParserreturns back as aCommandobject. - All
XYZCommandParserclasses (e.g.,AddCommandParser,DeleteCommandParser, …) inherit from theParserinterface so that they can be treated similarly where possible e.g, during testing.
Model component
API : Model.java
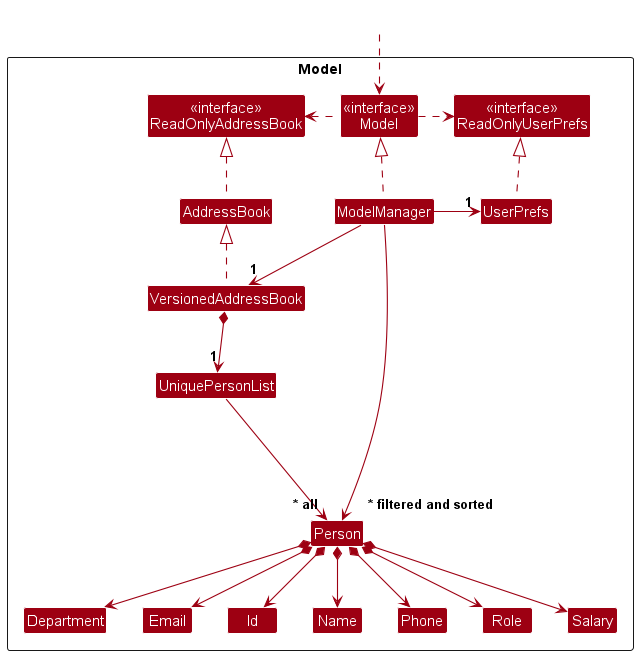
The Model component,
- stores the address book data i.e., all
Personobjects (which are contained in aUniquePersonListobject). - stores the currently ‘selected’
Personobjects (e.g., results of a search query) as a separate filtered and sorted list which is exposed to outsiders as an unmodifiableObservableList<Person>that can be ‘observed’ e.g. the UI can be bound to this list so that the UI automatically updates when the data in the list change. - stores a
UserPrefobject that represents the user’s preferences. This is exposed to the outside as aReadOnlyUserPrefobjects. - does not depend on any of the other three components (as the
Modelrepresents data entities of the domain, they should make sense on their own without depending on other components)
Storage component
API : Storage.java
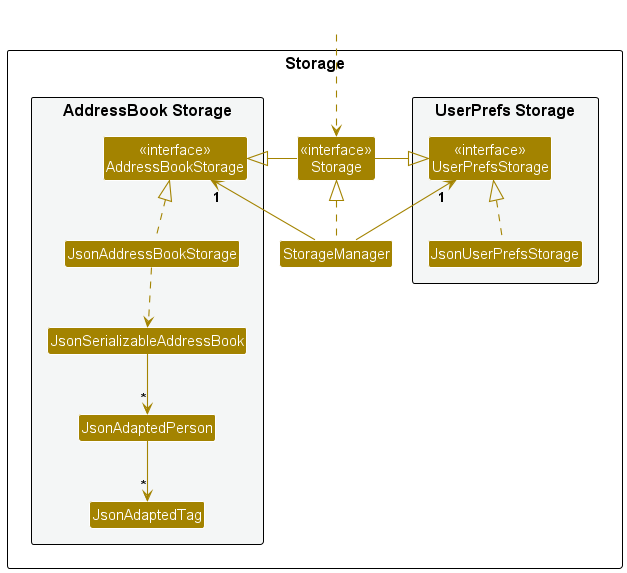
The Storage component,
- can save both address book data and user preference data in JSON format, and read them back into corresponding objects.
- inherits from both
AddressBookStorageandUserPrefStorage, which means it can be treated as either one (if only the functionality of only one is needed). - depends on some classes in the
Modelcomponent (because theStoragecomponent’s job is to save/retrieve objects that belong to theModel)
Common classes
Classes used by multiple components are in the seedu.addressbook.commons package.
Implementation
This section describes some noteworthy details on how certain features are implemented.
Add feature
Implementation
The add feature is facilitated by the following operations:
-
AddCommandParser#parse— Parses user’s inputs and checks that inputs are valid. -
model#hasPerson— Checks if the employee exists in EmployeeManager. -
model#addPerson— Adds an employee to EmployeeManager.
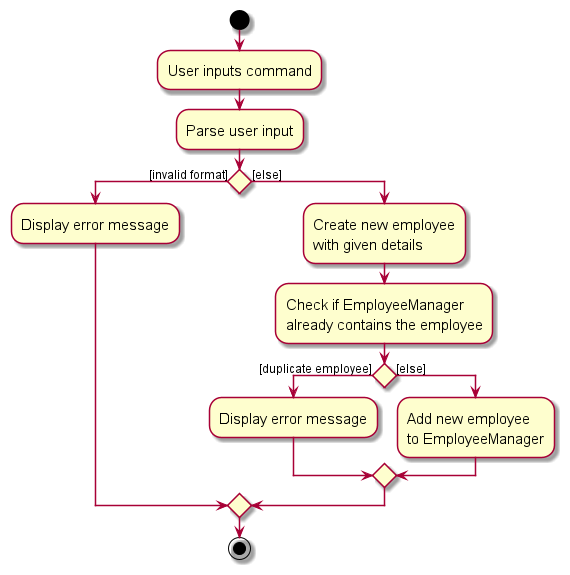
Given below is an example usage scenario and how the add mechanism behaves at each step.
Step 1. The user enters add i/A00001 n/John Doe p/98765432 e/johnd@example.com d/Finance r/Manager s/5000 to add a new employee John Doe.
The user input is parsed and checked using AddCommandParser#parse to create an AddCommand that contains the new employee.
Step 2: AddCommand then checks that the new employee is not a duplicate employee using model#hasPerson before
adding the new employee into EmployeeManager using model#addPerson.
The following activity diagram summarizes what happens when a user executes the add command:
Design considerations
Aspect: What is considered a duplicate employee:
-
Alternative 1: Check if the name of the given employee matches the name of another employee in EmployeeManager.
- Pros: Only need to check for duplicate names.
- Cons: Employees can have the same names, so it is not realistic to restrict the addition of employees to only employees with different names.
-
Alternative 2 (current choice): Check if the ID of an employee matches the ID of another employee in EmployeeManager.
- Pros: Able to store employees with the same attributes if their IDs are different.
- Cons: Need to store an additional field for ID.
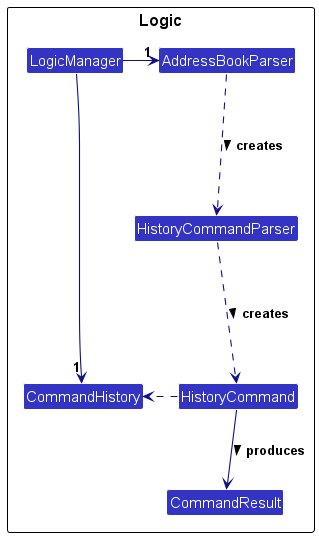
History feature
The history feature allows users to access past valid commands that they made. This feature is supported by
three classes, CommandHistory, HistoryCommandParser and HistoryCommand.
Implementation
CommandHistory: This class is responsible for storing the history of valid commands that the user has entered.
HistoryCommandParser: Parses the user input to create an appropriate HistoryCommand object.
HistoryCommand: Executes the history command.
After a successful user command has been executed CommandHistory#add(input) will be called to store the successful
user input in the CommandHistory. When a user inputs a history command with the appropriate argument, the
AddressBookParser will be called to produce the HistoryCommandParser to properly parse the input. A
HistoryCommand object will be created. When the Command#execute(model, commandHistory) is called on the
HistoryCommand, the HistoryCommand will call CommandHistory#getUserCommandHistory() to get the list of
valid user commands. HistoryCommand will then return a string of the appropriate number of user command that the
user has specified.
Design considerations
Aspect: Which component should we choose to store CommandHistory:
-
Alternative 1 (current choice): Store it under
Logic.
Why: TheLogiccomponent is responsible for command execution and parsing. Adding a history feature here would allow you to easily keep track of commands as they are executed. -
Alternative 2: Store it under
Model.
Why: TheModelcomponent is responsible for maintaining the state of the application. If we consider the command history part of the application’s state, it might make more sense to put it here.
Decision: Since the command history is only active for the duration of the application and does not need
to be saved, placing it in the logic component is more appropriate. If the command history need to persist
across sessions, it might be better to place it in the model component, as this layer is generally responsible
for data to be saved.
Help feature
The help feature provides users with a summary of the commands and includes a link to the user guide for further reference.
Implementation
HelpCommand: Executes the help command.
When the user inputs a help command, the AddressBookParser will process the input and create a HelpCommand.
The HelpCommand is then executed by Command#execute(model, commandHistory) and produces a CommandResult that will display
the help window to the user.
Sort feature
Implementation
The sort command is facilitated by ModelManager. ModelManager contains a SortedList<Person> and
FilteredList<Person> to provide sorting and filtering on the same list. The original list is fetched from
AddressBook#getPersonList() and passed to the FilteredList. The FilteredList is then passed to the SortedList.
By returning the SortedList as an ObservableList<Person>, the UI will be able to update the person cards displayed
after the find or sort command has been used.
To facilitate comparing between two Person objects, the attributes also implement Comparable<Person>. The
comparators for the attributes can be used to then compare two Person on a specific attribute.
The command only allows for the sorting to be performed on one of the Person’s attribute. The SortCommandParser will
extract the attribute, and create a SortCommand using the corresponding comparator for that attribute. The sequence
diagram below illustrates how the comparator is obtained and passed to the Model to be executed.
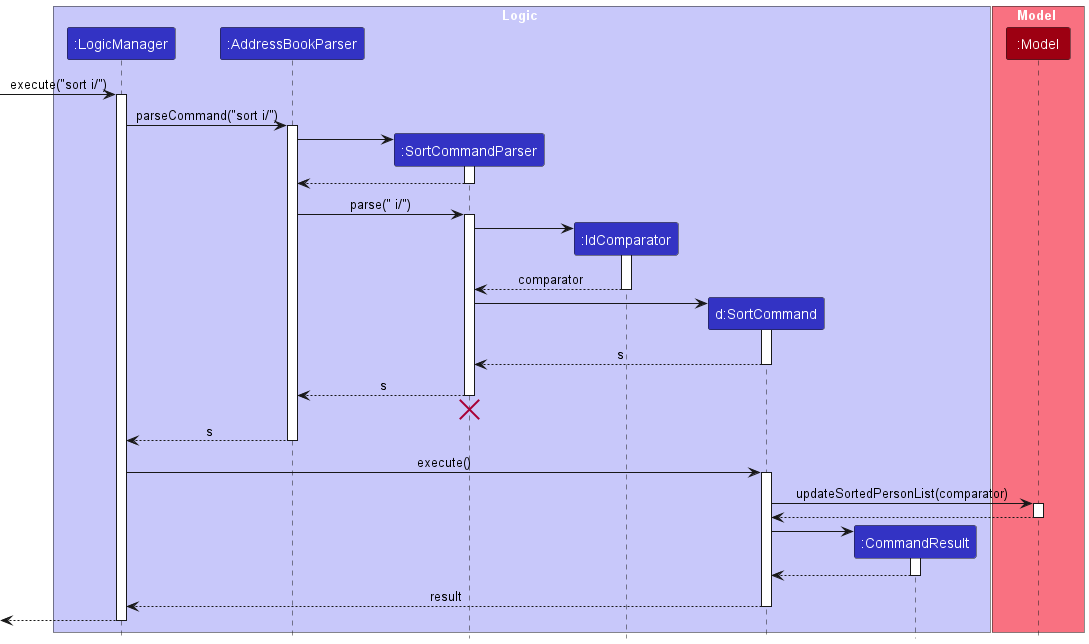
SortCommandParser should
end at the destroy marker (X) but due to a limitation of PlantUML, the lifeline reaches the end of diagram.
Find feature
Implementation
The Find feature is facilitated by the following operations:
-
Model#updateFilteredPersonList()— Updates the filtered person list based on the Predicategiven to the FindCommand object.
Given below is an example usage scenario and how the find mechanism behaves at each step.
Step 1. The user executes find n/alex bernice to find all employees that either contain the full word alex or bernice in their name.
FindCommandParser parses the user input and creates a FindCommand.
Step 2. Then FindCommand is executed, and it will call Model#updateFilteredPersonList() to update the filtered list in the model to only include
employees whose names contain either the full word alex or bernice.
The following sequence diagram illustrates how the find feature works:
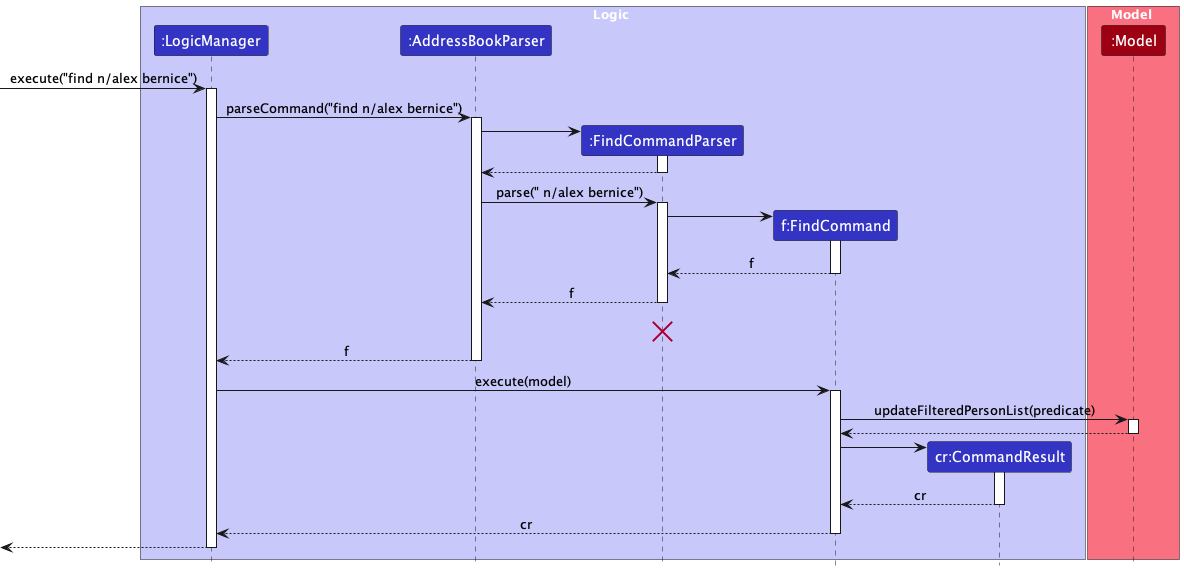
FindCommandParser should end at the destroy marker (X) but due to a limitation of PlantUML, the lifeline reaches the end of the diagram.
Edit feature
The edit feature allows users to update specific information about certain employees. This feature is supported by
three classes, EditCommand, EditCommandParser and Model.
Implementation
EditCommand: Stores the edited changes to be changed.
EditCommandParser: Parses the user’s edit command to create an appropriate EditCommand object.
Model: Fetches the employee list from Model#getSortedFilteredPersonList() and finds the employee whose information needs to be edited.
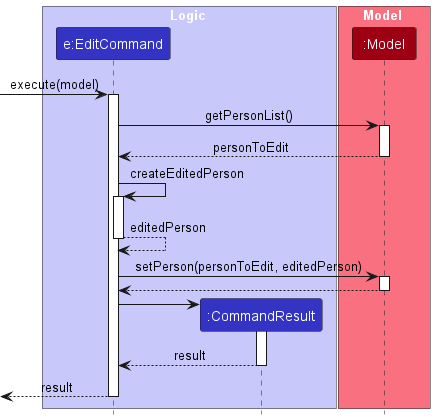
Given below is an example usage scenario of edit command.
Step 1: The user enters edit 2 p/12345678 to update the phone number of the second employee in the list.
EditCommandParser parses the user command and creates a EditCommand.
Step 2: EditCommand then gets executed. It calls Model#setPerson() to update the information of the chosen employee.
The sequence diagram below illustrates how the edit command works:
Increment feature
Implementation
The increment feature is facilitated by the following operations:
-
Model#getSortedFilteredPersonList()— Returns the list of employees in the filtered list. -
Model#setPerson(target, editedPerson)— Replaces the giventargetwith theeditedPersonthat has the incremented salary with all other attributes oftargetunchanged.
Given below is an example usage scenario and how the increment mechanism behaves at each step.
Step 1. The user has executed find d/Marketing to filter the employee list by the department Marketing.
- The
FindCommandupdates the filtered list inModelto contain only employees whose department isMarketing.
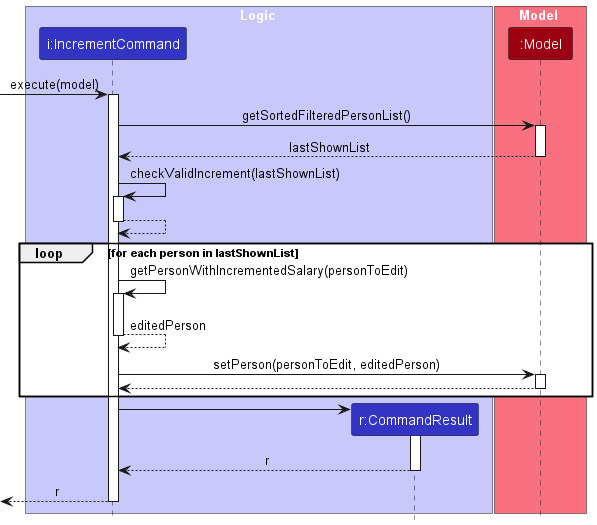
Step 2. The user executes increment 1000 to increment the salaries of all employees in the filtered list.
The associated command IncrementCommand first calls Model#getSortedFilteredPersonList() to obtain the filtered list of persons.
Step 3. IncrementCommand then checks that the increment is valid for all persons in the filtered list using IncrementCommand#checkValidIncrement(personList).
Step 4. For each person in the filtered list, an editedPerson with the incremented salary and no other details changed is constructed, before Model#setPerson(target, editedPerson) is called to replace the current person with the editedPerson.
The following sequence diagram illustrates how the increment feature works:
Design considerations
Aspect: When the validity of the given increment is checked:
-
Alternative 1 (current choice): Check validity before incrementing any person’s salary.
- Pros: Ensures that
incrementis valid before any modifications is made to the persons in EmployeeManager. - Cons: Have to loop through the filtered list twice: once to check the validity of
incrementand once to increment the salaries.
- Pros: Ensures that
-
Alternative 2: Check validity while incrementing each person’s salary.
- Pros: Less time required to check and increment salaries.
- Cons: If the
incrementis invalid for a person halfway through the list, some persons would have their salaries incremented while the remaining persons would not have their salaries incremented.
Undo/redo feature
Implementation
The undo/redo mechanism is facilitated by VersionedAddressBook. It extends AddressBook with an undo/redo history, stored internally as an addressBookStateList and currentStatePointer. Additionally, it implements the following operations:
-
VersionedAddressBook#commit()— Saves the current address book state in its history and remove undone states. -
VersionedAddressBook#undo()— Restores the previous address book state from its history. -
VersionedAddressBook#redo()— Restores a previously undone address book state from its history.
These operations are exposed in the Model interface as Model#commitAddressBook(), Model#undoAddressBook() and Model#redoAddressBook() respectively.
Given below is an example usage scenario and how the undo/redo mechanism behaves at each step.
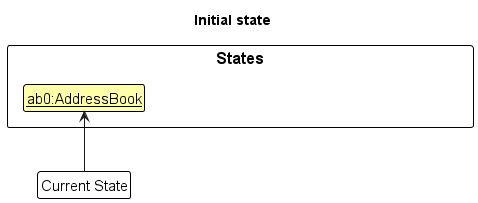
Step 1. The user launches the application for the first time. The VersionedAddressBook will be initialized with the initial address book state, and the currentStatePointer pointing to that single address book state.
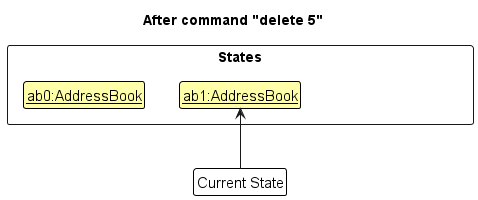
Step 2. The user executes delete 5 command to delete the 5th person in the address book. The delete command calls Model#commitAddressBook(), causing the modified state of the address book after the delete 5 command executes to be saved in the addressBookStateList, and the currentStatePointer is shifted to the newly inserted address book state.
Step 3. The user executes add n/David … to add a new person. The add command also calls Model#commitAddressBook(), causing another modified address book state to be saved into the addressBookStateList.
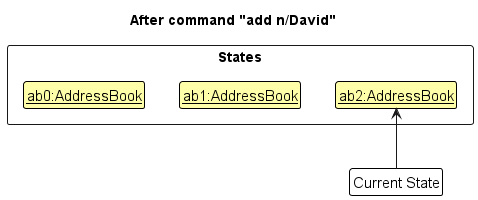
Model#commitAddressBook(), so the address book state will not be saved into the addressBookStateList.
Step 4. The user now decides that adding the person was a mistake, and decides to undo that action by executing the undo command. The undo command will call Model#undoAddressBook(), which will shift the currentStatePointer once to the left, pointing it to the previous address book state, and restores the address book to that state.
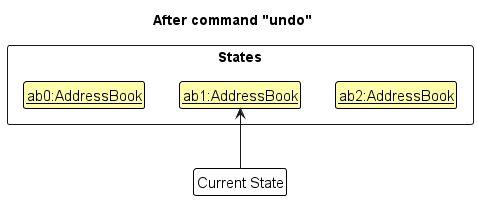
currentStatePointer is at index 0, pointing to the initial AddressBook state, then there are no previous AddressBook states to restore. The undo command uses Model#canUndoAddressBook() to check if this is the case. If so, it will return an error to the user rather
than attempting to perform the undo.
The following sequence diagram shows how the undo operation works:
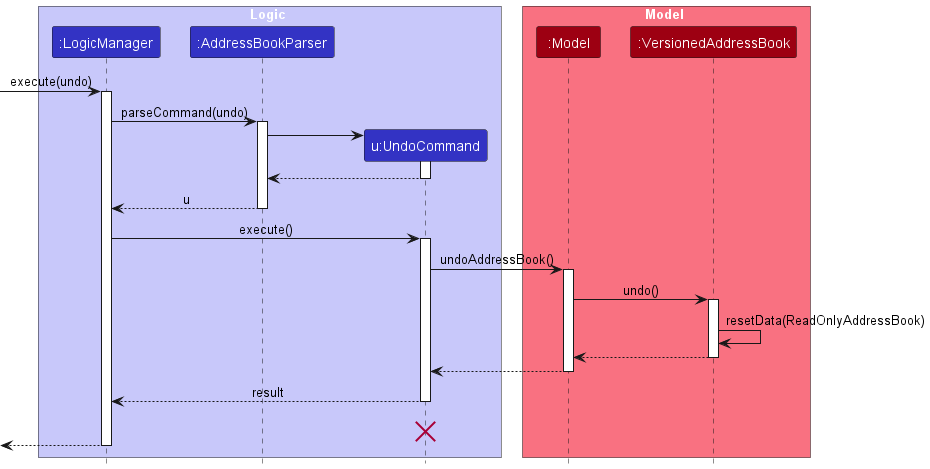
UndoCommand should end at the destroy marker (X) but due to a limitation of PlantUML, the lifeline reaches the end of diagram.
The redo command does the opposite — it calls Model#redoAddressBook(), which shifts the currentStatePointer once to the right, pointing to the previously undone state, and restores the address book to that state.
currentStatePointer is at index addressBookStateList.size() - 1, pointing to the latest address book state, then there are no undone AddressBook states to restore. The redo command uses Model#canRedoAddressBook() to check if this is the case. If so, it will return an error to the user rather than attempting to perform the redo.
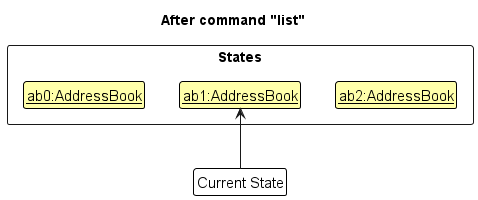
Step 5. The user then decides to execute the command list. Commands that do not modify the address book, such as list, will usually not call Model#commitAddressBook(), Model#undoAddressBook() or Model#redoAddressBook(). Thus, the addressBookStateList remains unchanged.
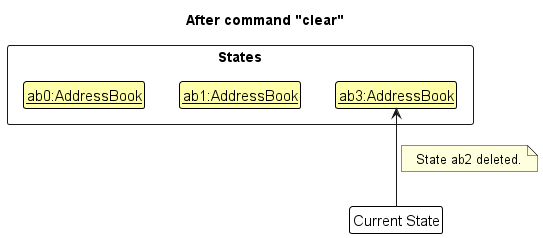
Step 6. The user executes clear, which calls Model#commitAddressBook(). Since the currentStatePointer is not pointing at the end of the addressBookStateList, all address book states after the currentStatePointer will be purged. Reason: It no longer makes sense to redo the add n/David … command. This is the behavior that most modern desktop applications follow.
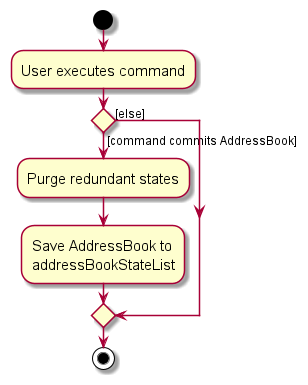
The following activity diagram summarizes what happens when a user executes a new command:
Design considerations
Aspect: How undo & redo executes:
-
Alternative 1 (current choice): Saves the entire address book.
- Pros: Easy to implement.
- Cons: May have performance issues in terms of memory usage.
-
Alternative 2: Individual command knows how to undo/redo by
itself.
- Pros: Will use less memory (e.g. for
delete, just save the person being deleted). - Cons: We must ensure that the implementation of each individual command are correct.
- Pros: Will use less memory (e.g. for
Clear feature
The clear feature is used to clear all persons from the displayed list in EmployeeManager.
Implementation
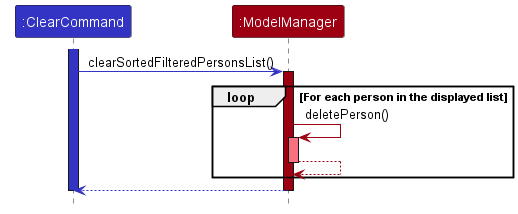
When the clear command is executed, it will call Model#clearSortedFilteredPersonList.
Model#clearSortedFilteredPersonList will loop through the persons in the filtered list and
delete each person from the filtered list using Model#deletePerson until the list is cleared.
Export/Import feature
The export feature allows the data file to be saved as a .json file on the disk. The import feature allows a
data file to be imported from the disk, replacing the current data in the application.
Implementation
The import and export commands both use JsonAddressBookStorage to facilitate writing and reading of data files.
The import command calls JsonAddressBookStorage#readAddressBook which will read the file in the specified file path
and attempt to parse the JSON data into a ReadOnlyAddressBook. The function also checks if the data file is invalid,
such as if it contains illegal value, or if no file is found at the file path.
The export command calls JsonAddressBookStorage#saveAddressBook which will serialize a ReadOnlyAddressBook and
write it to the file path on the disk.
A GUI option for importing and exporting was also implemented to allow users who are unfamiliar with file paths to use the feature as well.
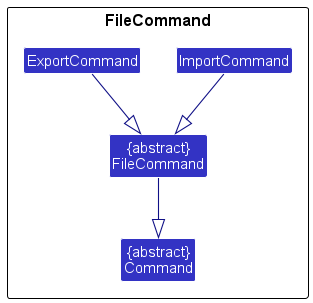
Another implementation detail is creating an abstract class FileCommand which inherits Command. Both ImportCommand
and ExportCommand inherit FileCommand. The reason for creating the FileCommand class is to reduce code
duplication as both commands share the same logic for checking the validity of the Path received.
Design considerations
Aspect: Format of the export & import command:
-
Alternative 1 (current choice):
export FILE_PATH,import FILE_PATH.- Pros: Provides flexibility in where the file can be exported to and imported from.
- Cons: Not all users might be familiar with specifying file paths. However, it can be mitigated with a GUI option to select the file path.
-
Alternative 2:
export FILE_NAME,import FILE_NAME.- Pros: Simple to use, only have to specify file name and not be concerned with file path.
- Cons: Troublesome, the files must be exported and imported from the same directory as the application.
Documentation, logging, testing, configuration, dev-ops
Appendix: Requirements
Product scope
Target user profile:
- Oversees a large workforce, ranging from 50 to 200 employees, in a small to medium-sized enterprise
- Prefers desktop apps over other types of apps
- Can type fast
- Prefers typing to mouse interactions
- Is reasonably comfortable using CLI apps
Value proposition: The application streamlines the process of handling large-scale employee data. With rapid typing capabilities, users can efficiently input and update employee details, reducing time spent on data management tasks.
User stories
Priorities: High (must have) - * * *, Medium (nice to have) - * *, Low (unlikely to have) - *
| Priority | As a … | I want to … | So that … |
|---|---|---|---|
* |
potential user exploring the app | view the app populated with sample data | I can easily see how the app will look when it is in use |
* * |
user paranoid about losing progress | have the data automatically saved | I will not lose any progress when the application shuts down unexpectedly |
* * |
new user | clear all current data | I can get rid of experimental data I used for exploring the app |
* |
new user | view a user-friendly tutorial of the app | I can understand the app’s features |
* * * |
HR staff member | add an employee to the application | I can keep track of their details |
* |
HR staff member | view two employees’ details side by side | I can easily compare the differences of the employees |
* * * |
HR staff member | edit employees’ details | I can keep the details of the employees up-to-date |
* * * |
HR staff member | remove employees who have left the company | their data does not clutter the application |
* * * |
HR staff member | search for employees using their names | I can find the employee that I am looking for |
* * * |
HR staff member | search for employees based on their departments | I can obtain the contact information of the employees in a department |
* * * |
HR staff member | search for employees based on their roles | I can easily increment the pay of all the staff with that role efficiently |
* * * |
HR staff member | search for employees using multiple attributes (e.g. department, salary, etc.) | I can narrow down my search to a target group of employees |
* |
HR staff member | view who I have looked at recently when I click the search bar | I can easily fetch employees that I have analyzed recently and make my work more convenient |
* |
HR staff member | generate reports on employees’ performance | I can provide the upper management better insights into their employees |
* * |
expert user | bind keyboard shortcuts for certain frequently used functions | I can work more efficiently |
* * * |
HR staff member | order my search results by various attributes (e.g. name, department, etc.) | I can view a list of employees in my desired manner |
* * |
HR staff member | view the history of changes, including who made the change and when the change was made | I can use them for auditing purposes |
* * |
HR staff member | add notes to employees’ details | I can document important information and interactions |
* |
advanced user | edit the saved data files manually without using the application | I can update and organise new information more conveniently |
* |
user with poor eyesight | view the information without straining my eyes by adjusting the text size | it is not difficult for me to use the application |
* |
HR staff member | collect and view an analysis of diversity metrics | I can promote a more diverse workplace |
* * |
HR staff member | export and import employee details | I can create backups and recover from data corruption |
* |
HR staff member | set performance goals for employees | I can align the employees with the company’s objectives |
* * |
careless HR staff member | undo my last command | I can easily revert to a copy with no mistakes if I made mistakes |
* * |
careless HR staff member | redo my command | I can redo a command that I accidentally undid |
* * |
HR staff member | increment and decrement multiple employees’ salaries together by the same amount | I do not need to repeat the same action for multiple employees |
* * |
user | view a list of commands available for me to use | I can efficiently navigate through the app’s features |
* * |
HR staff member | delete all employees displayed in the list | I can efficiently delete employee data based on specific criteria |
* * |
user | view the history of my previous commands | I can review and track my past actions within the app |
Use cases
(For all use cases below, the System is the EmployeeManager and the Actor is the user, unless specified otherwise)
Use case: UC1 - View all employees
MSS
- User requests to view all employees.
- EmployeeManager shows a list of employees.
Use case ends.
Use case: UC2 - Add a new employee
MSS
- User requests to add a new employee with the employee’s details.
- EmployeeManager adds the employee.
- EmployeeManager shows an updated list of employees.
Use case ends.
Extensions
- 1a. EmployeeManager detects that not all required information is entered.
- 1a1. EmployeeManager shows an error message.
Use case ends.
- 1a1. EmployeeManager shows an error message.
- 1b. EmployeeManager detects invalid information.
- 1b1. EmployeeManager shows an error message.
Use case ends.
- 1b1. EmployeeManager shows an error message.
- 1c. EmployeeManager detects a duplicate employee.
- 1c1. EmployeeManager shows an error message.
Use case ends.
- 1c1. EmployeeManager shows an error message.
Use case: UC3 - Delete an employee
MSS
- User requests to delete an employee with an index.
- EmployeeManager deletes the employee.
- EmployeeManager shows an updated list of employees.
Use case ends.
Extensions
- 1a. The given index is invalid.
- 1a1. EmployeeManager shows an error message.
Use case ends.
- 1a1. EmployeeManager shows an error message.
Use case: UC4 - Edit an employee
MSS
- User requests to edit an employee with index and new details.
- EmployeeManager edits the employee.
- EmployeeManager shows an updated list of employees.
Use case ends.
Extensions
- 1a. The given index is invalid.
- 1a1. EmployeeManager shows an error message.
Use case ends.
- 1a1. EmployeeManager shows an error message.
- 1b. EmployeeManager detects invalid information.
- 1b1. EmployeeManager shows an error message.
Use case ends
- 1b1. EmployeeManager shows an error message.
- 1c. No details are given.
- 1c1. EmployeeManager shows an error message.
Use case ends.
- 1c1. EmployeeManager shows an error message.
- 1d. EmployeeManager detects a duplicate ID.
- 1d1. EmployeeManager shows an error message.
Use case ends.
- 1d1. EmployeeManager shows an error message.
Use case: UC5 - Find employees from a department
MSS
- User requests to find employees in a department.
- EmployeeManager finds all employees who are in the department.
- EmployeeManager updates the displayed list with the found employees.
Use case ends.
Extensions
- 1a. The user did not input the valid predefined prefix to search for the employee by department.
- 1a1. EmployeeManager shows an error message.
Use case ends.
- 1a1. EmployeeManager shows an error message.
Use case: UC6 - Bulk increment salaries
MSS
- User requests to increment salaries of all employees in the displayed list by an increment amount.
- EmployeeManager increments the salaries of all employees in the displayed list.
- EmployeeManager shows an updated list of employees.
Use case ends.
Extensions
- 1a. The given increment amount is invalid.
- 1a1. EmployeeManager shows an error message.
Use case ends.
- 1a1. EmployeeManager shows an error message.
Use case: UC7 - View command history
MSS
- User requests to view a specified number of recent commands.
- EmployeeManager fetches the required number of recent commands.
- EmployeeManager displays the fetched commands to the user.
Use case ends.
Extensions
- 1a. The user enters an invalid number.
- 1a1. EmployeeManager shows an error message.
Use case ends.
- 1a1. EmployeeManager shows an error message.
Use case: UC8 - Sort the displayed list
MSS
- User requests to sort the displayed list based on an attribute.
- EmployeeManager displays the sorted list based on the specified attribute.
Use case ends.
Extensions
- 1a. The user enters an invalid attribute.
- 1a1. EmployeeManager shows an error message.
Use case ends.
- 1a1. EmployeeManager shows an error message.
- 1b. The user enters multiple attributes.
- 1b1. EmployeeManager shows an error message.
Use case ends.
- 1b1. EmployeeManager shows an error message.
Use case: UC9 - Export data file
MSS
- User requests to export the data file to a specified file path.
- EmployeeManager saves the data file to the specified file path.
- EmployeeManager displays a success message.
Use case ends.
Extensions
- 1a. The user enters an invalid file path.
- 1a1. EmployeeManager shows an error message.
Use case ends.
- 1a1. EmployeeManager shows an error message.
Use case: UC10 - Import data file
MSS
- User requests to import the data file from a specified file path.
- EmployeeManager reads the data file from the specified file path.
- EmployeeManager shows the updated list of employees imported from the data file.
Use case ends.
Extensions
- 1a. The user enters an invalid file path.
- 1a1. EmployeeManager shows an error message.
Use case ends.
- 1a1. EmployeeManager shows an error message.
- 1b. The user enters a file path where the file doesn’t exist.
- 1b1. EmployeeManager shows an error message.
Use case ends.
- 1b1. EmployeeManager shows an error message.
- 1c. The user enters a file path where the data file is corrupted.
- 1c1. EmployeeManager shows an error message.
Use case ends.
- 1c1. EmployeeManager shows an error message.
Non-Functional Requirements
-
Cross-platform Capability: Should work on any mainstream OS as long as it has Java
11or above installed. -
Performance: Should be able to store up to
200persons without a noticeable sluggishness in performance for typical usage. - UI Responsiveness: The UI should respond to user interaction.
- Error Handling: Should gracefully handle input errors without system crash and data loss.
- Code Documentation: Code should be well-documented to facilitate maintenance and updates.
- Code Version Control: The software codebase should be managed using Git Milestone to track changes.
- Keyboard Efficiency: A user with above average typing speed for regular English text (i.e. not code, not system admin commands) should be able to accomplish most of the tasks faster using commands than using the mouse.
Glossary
- Mainstream OS: Windows, Linux, Unix, OS-X.
- UI: User Interface, the graphical or textual interface through which a user interacts with a software application.
- Git Milestone: A git milestone is a way to track progress on a group of issues or pull requests in a repository which can achieved within a specified amount of time by setting a start and due date.
Appendix: Instructions for manual testing
Given below are instructions to test the app manually.
Launch and shutdown
-
Initial launch
-
Download the jar file and copy into an empty folder.
-
Double-click the jar file.
Expected: Shows the GUI with a set of sample employees. The window size may not be optimum.
-
-
Saving window preferences
-
Resize the window to an optimum size. Move the window to a different location. Close the window.
-
Re-launch the app by double-clicking the jar file.
Expected: The most recent window size and location is retained.
-
Adding an employee
-
Test case:
add i/A00001 n/John Doe p/98765432 e/johnd@example.com d/Finance r/Manager s/5000
Expected: An employee with the correct details is added to the end of the list. -
Test case:
add
Expected: No employee is added. Error details shown in the status message.
Deleting an employee
-
Prerequisites: List all employees using the
listcommand. Multiple employees in the list. -
Deleting an employee from the displayed list
-
Prerequisites: List all employees using the
listcommand. At least one employee in the list. -
Test case:
delete 1
Expected: First employee is deleted from the list. Details of the deleted employee shown in the status message.
-
-
Test case:
delete 0
Expected: No employee is deleted. Error details shown in the status message. -
Other incorrect delete commands to try:
delete,delete x,...(where x is larger than the list size)
Expected: Similar to previous.
Incrementing salaries of multiple employees
-
Test case:
increment 1000
Prerequisite: There are multiple employees in the displayed list and the salaries of all employees do not exceed the maximum salary after increasing by 1000.
Expected: Salaries of all employees in the list increased by 1000. -
Test case:
increment -10000
Prerequisite: There are multiple employees in the displayed list and the salary of at least one employee in the displayed list is below 10000.
Expected: No change in salaries of all employees. Error details shown in the status message.
Undoing a modification
-
Test case:
delete 1followed byundo
Prerequisite: List all persons using thelistcommand. At least one person in the list.
Expected: The list is reverted to the list of employees beforedelete 1was executed. -
Test case:
undo
Prerequisite: All commands have been undone or no commands that made a modification to employee data has been made.
Tip: A quick way to achieve the prerequisite is to close and reopen the application.
Expected: No change in displayed list and employee data. Error details shown in the status message.
Redoing the previous undone command
-
Test case:
delete 1followed byundofollowed byredo
Prerequisite: List all persons using thelistcommand. At least one person in the list.
Expected: The list is reverted to the list of employees afterdelete 1was executed. -
Test case:
redo
Prerequisite: No commands have been undone.
Expected: No change in displayed list and employee data. Error details shown in the status message.
Editing an employee
-
Prerequisites: List all employees using the
listcommand. At least one employee in the list. -
Test case:
edit 1 n/John Tan
Expected: First employee in the list has their name edited toJohn Tan. Details of the edited employee is shown in the status message. -
Other correct edit commands to try:
edit 1 p/12345678,edit 1 d/Accountingandedit 1 r/Manager
Expected: Similar to previous, the respective fields gets edited. -
Test case:
edit 0
Expected: No employee is edited. Error details shown in the status message. -
Other incorrect edit commands to try:
edit,edit x,...(where x is larger than the list size)
Expected: Similar to previous.
Sorting the list
-
Prerequisites: List all employees using the
listcommand. Multiple employees in the list. -
Test case:
sort n/
Expected: Displayed list is sorted by alphabetical order of the name field. -
Other correct sort commands to try:
sort d/,sort r/andsort e/
Expected: Similar to previous, the respective fields gets sorted based on lexicographical order. -
Test case:
sort
Expected: Displayed list is not sorted. Error details shown in the status message.
Finding an employee
-
Tip: Create distinct employees, one with the name
John, one with the departmentFinance, and one with the roleManagerto effectively test whether the find command works for each field. -
Test case:
find n/John
Expected: Finds all employees whose names include the wordJohn. -
Test case:
find d/Finance
Expected: Finds all employees whose department include the wordFinance. -
Test case:
find r/Manager
Expected: Finds all employees whose role include the wordManager. -
Test case:
find
Expected: The displayed list is not filtered. Error details shown in the status message.
Viewing command history
-
Test case:
delete 1followed byhistory 1
Expected: The previous commanddelete 1is shown in the status message. -
Test case:
history 0
Expected: Error details shown in the status message.
Exporting data file
-
Test case:
export fy2324.json
Prerequisite: The application has write access to the directory where EmployeeManager is.
Expected: The data file will be written to the directory where EmployeeManager is asfy2324.json. -
Test case:
export fy2324
Expected: The file name does not have the .json file extension. Error details shown in the status message. -
Test case:
export /
Expected: The file path is invalid as it is a directory. Error details shown in the status message.
Importing data file
-
Test case:
export fy2324.json, followed byclear, thenimport fy2324.json
Prerequisites: The application has read access to the specified file path. The filefy2324.jsonmust exist at the specified file path - which will be the directory where EmployeeManager is in this case.
Expected: The data filefy2324.jsonwill be imported into the application and overwrite existing data. -
Test case:
import fy9999.json
Prerequisites: The filefy9999.jsondoes not exist in the directory where EmployeeManager is.
Expected: Error details shown in the status message. -
Test case:
export fy2324.json, followed by removing some brackets in the exportedfy2324.jsonfile using any text editor, followed byimport fy2324.json.
Prerequisites: The filefy2324.jsonis corrupted (the data does not conform to the format of EmployeeManager’s data file).
Expected: Error details shown in the status message.
Viewing help window
- Test case:
help
Expected: A help window should open, accompanied by a success message statingOpened help window..
Appendix: Planned Enhancements
1. Export command FILE_NAME should be a non-empty String
The current implementation of export command allows the use of an empty string as the FILE_NAME, allowing commands like export .json to be executed.
This behaviour, while functional on Windows, results in the creation of hidden files in other operating systems, leading to inconsistent behavior.
To address this, we plan to make the validation checks stricter for the
FILE_NAME in the export command. This enhancement will prevent the use of empty strings in FILE_NAME,
thereby reducing the chances of bugs and ensuring a more consistent experience across different operating systems.
2. Allow the use of prefixes in name field
The current implementation of EmployeeManager triggers errors when prefixes are used in names.
For example, s/ is designated as a prefix for salary. As a result, when the name field includes s/o, it triggers
several errors such as those related to multiple prefixes or salary constraints.
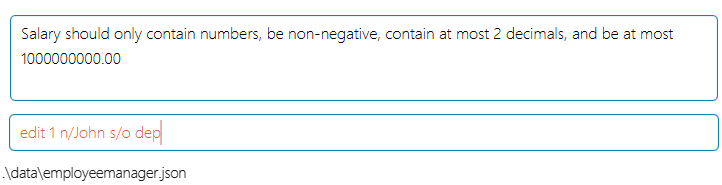
We plan to add an escape character, such as a backslash, “\”, This will allow more flexibility for name entries. For example, with this enhancement, a command like edit 1 n/John \s/o dep would be valid,
changing the name of the person at index one to John s/o dep. The s/o will be recognised as part of a name rather than a salary prefix.
3. Change all mentions of addressbook to employeemanager
Our project is a brownfield project adapted from AB3, it contains several references to addressbook such as the AddressBookParser and AddressBook.
While our primary focus has been on enhancing and improving the functionality of the software to cater to our target audience, we recognise the
need to have consistent naming conventions for clarity. Therefore, we plan to update all mentions of addressbook to employeemanager.
4. Stringent email validation
The current implementation of EmployeeManager allows invalid emails such as abc@gmail, which fall short of the standard email address formats.
We understand the importance of data validation to our target audience, hence we plan add more stringent email validation that checks for proper
username@domainname.extension formatting.
5. Improve clarity of success message for undo commands
The current implementation of the undo command only shows that the command has been undone successfully, it does not specify what command has been undone.
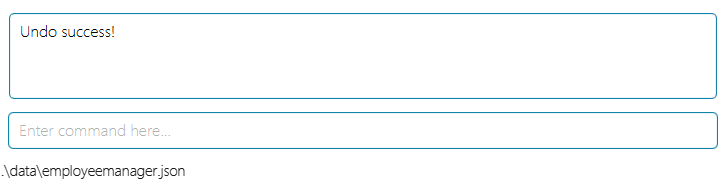
To enhance user experience and provide detailed feedback to the user, we plan to include the specific command that was undone.
6. Improve clarity of success message for redo commands
The current implementation of the redo command only shows that the command has been redone successfully, it does not specify what command has been redone.
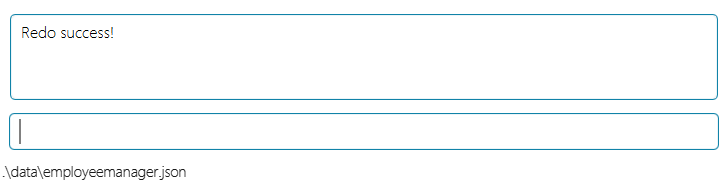
To enhance user experience and provide detailed feedback to the user, we plan to include the specific command that was redone.
7. Enhance validation for sort command
The current implementation of the sort command allows users to input additional values after the sorting prefix, although they will be ignored.
For example commands like sort n/abc and sort n/s/ are both valid sort commands that will sort by name.
We plan to enhance validation such that an error message will be shown if extra values are input after the sorting prefix.
The proposed error message, The sort command prefixes should not be used with values, will guide the user towards the correct usage of the sort command.
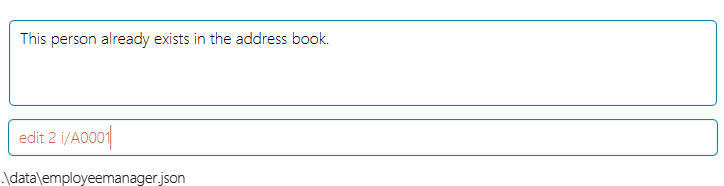
8. Enhance error message for edit command
The current implementation of EmployeeManager checks for duplicate employees based on their Id field.
Consequently, editing an employee’s Id to a value that already exists will result in an error message This person already exists in the address book..
This might be unclear to the users as the error message is not specific in stating what causes the duplicate.
We plan to enhance the error message to make it clearer. For example, by stating that
This employee id is already in use and may result in a duplicate person..
9. Increase support for a broader range of display compatibility
The current implementation of EmployeeManager is optimized for standard screen resolutions, specifically 1920x1080, and is best viewed at a screen scale of 100%. We plan to enhance EmployeeManager’s display compatibility with a broader range of screen resolutions and scales, to suit all office needs.
10. Allow sort to be case-insensitive
The current implementation of the sort command sorts the person list by their attribute in lexicographical order. However, this can lead to unintended behaviour as it is case-sensitive. For example, if there are three persons with departments: Finance, IT, finance, the persons from the finance department would be separated by IT due to lexicographical order. We intend to make sort command case-insensitive by default, and allow case-sensitive by specifying an addition flag.
The original command looks like: sort d/, and our new proposed format might look like sort d/ case/ with the case/ flag specifying the sort should be case-sensitive, and lack of flag specifying the sort should be case-insensitive.
Appendix: Effort
Difficulty level
We felt that the difficulty level was moderate. The original AB3 codebase was large and it took us some time to understand how the components worked together.
Challenges encountered
This list highlights some of the key challenges we faced:
- It was challenging to change the person class at the start of our project as we needed to coordinate extensively with one another to avoid high amounts of merge conflicts.
- As our salary attribute needed to hold a number and conduct operations on it, there were problems arising from the usage of floating point numbers. We had to change from using
doubleto usinglongto fix those bugs. - The implementation of the
sortcommand was not straightforward. JavaFX API only hasSortedListandFilteredList. To achieve both effects, we had to find a way to ‘combine’ them to allow sorting and filtering on the same list. - For the
importandexportcommands, the file path was difficult to handle. Different operating systems have different formats and specifications. The tests had to be designed for the different OS as well. - For the
historycommand, we had to decide where to store the class that was supposed to store the previous command and how it should be integrated into the application. - For the
findcommand, we had to find a way to combine all the predicates into one so that we can find employees who fulfill multiple find parameters. There was also a challenge faced with finding employees by salary which is related to the aforementioned challenge with salary. - We had to create and go through multiple mockups for the UI to decide which design was best suited for the product.
Effort required
- Modified code base heavily.
- Weekly meetings to discuss progress and plan weekly tasks.
- We created a comprehensive suite of tests to cover a wide range of cases.
Achievements
- Successfully met all milestones and deadlines.
- Implemented most of our important user stories.
- Practiced good software engineering practices.
- Forking Workflow
- Issues Tracker, Milestones, etc.
- Code Quality