User Guide
Welcome to EmployeeManager! Do you need to manage employees? Are you having trouble using spreadsheets? Or does your organisation not have a proper employee management system? EmployeeManager is the application for you!
EmployeeManager is a desktop application for Human Resources (HR) staff to manage employees in a small or medium-sized enterprise (SME).
Here’s an overview of EmployeeManager’s features:
- Consolidate and manage employee details in a single application
- Find and sort employees by various attributes
- Easily increment salary or delete many employees at once
EmployeeManager is optimised for use via a Command Line Interface (CLI) while still having the benefits of a Graphical User Interface (GUI). If you can type fast, EmployeeManager can get your employee management tasks done more quickly than traditional GUI apps, so HR staff can be more efficient.
This User Guide aims to help both new and experienced users use EmployeeManager. Learn to leverage the features of EmployeeManager to make managing employees easier!
If you are a new user:
- Get started with EmployeeManager by going through the Quick start
- If you have no prior experience with CLI or require a refresher, refer to this guide
If you are an experienced user:
- Refer to the Table of contents to jump to the section that you are looking for
Table of contents
- Table of contents
- Quick start
- How to use command line interface
- Prefix summary
-
Features
- Viewing help :
help - Adding an employee:
add - Listing all employees :
list - Editing an employee :
edit -
Finding an employee by multiple attributes:
find - Deleting an employee :
delete - Sorting displayed employees :
sort - Incrementing multiple employees’ salaries:
increment - Undoing a modification :
undo - Redoing the previous undone command :
redo -
Importing data :
import -
Exporting data :
export - Viewing command history :
history - Clearing multiple employees’ data :
clear - Exiting the program :
exit - Specifying data file path
- Saving the data
- Editing the data file
- Viewing help :
- FAQ
- Known issues
- Command summary
- Glossary table
Quick start
- Ensure you have Java
11or above installed on your computer.- Open the terminal on your computer.
- Windows: Open Windows Search and search for “terminal”.
- Mac: Open Spotlight Search and search for “terminal”.
-
Linux: Press
Ctrl + Alt + T.
- Type
java --versioninto the terminal. - If you have java installed, it should look similar to this:

- Check that your version starts with
11or higher. - If you do not have Java
11or above installed, you can download Java11here.
- Open the terminal on your computer.
-
Download the latest
EmployeeManager.jarfrom here. -
Copy the file to the folder you want to use as the home folder for your EmployeeManager. Files required to run EmployeeManager will be created in the home folder.
-
Open a command terminal, type the
cd FOLDERcommand, substitutingFOLDERwith the folder path of the folder you put the jar file in.
Thecdcommand changes the working directory of the terminal, allowing EmployeeManager to be launched in the next step. -
Type the
java -jar EmployeeManager.jarcommand to run the application.
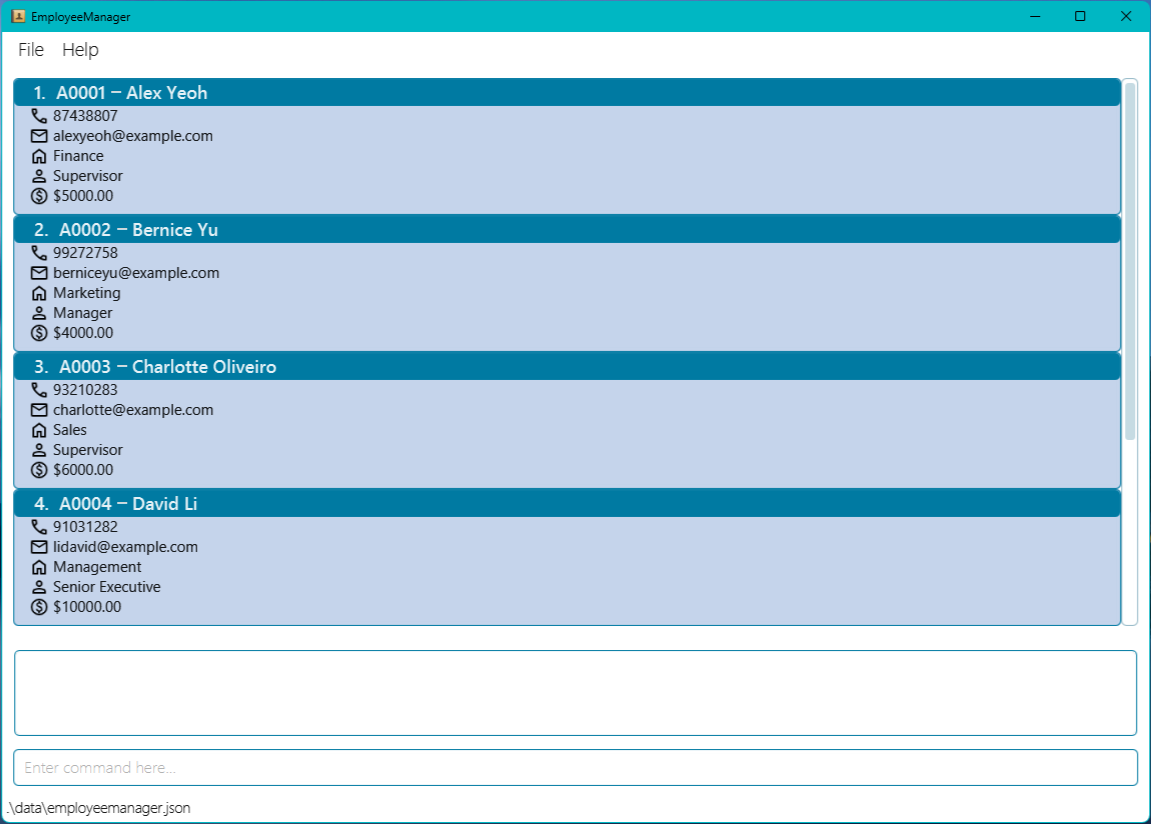
A GUI similar to the below should appear in a few seconds. Note how the app contains some sample data.
-
Type the command in the command box and press Enter to execute it. e.g. typing
helpand pressing Enter will open the help window.
Some example commands you can try:-
list: Lists all employees. -
add i/A00001 n/John Doe p/97328601 e/johndoe@example.com d/Marketing r/Manager s/5000: Adds an employee namedJohn Doeto EmployeeManager. -
delete 2: Deletes the 2nd contact shown in the current list. -
exit: Exits the app.
-
- Refer to the Features below for details of each command.
How to use command line interface
-
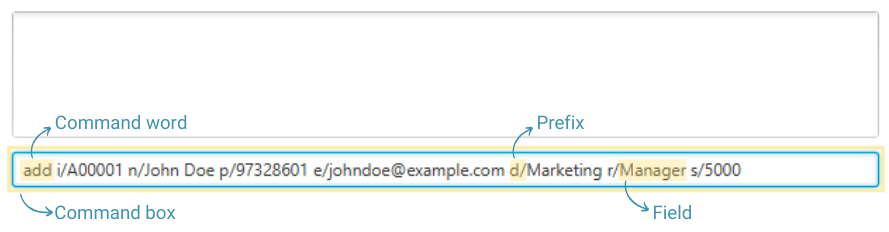
Click on the command box.
- Type the command word.
- Example:
addis the command word for adding an employee.
- Example:
- Follow the command format of the command and type the prefixes and/or fields required.
- Refer to the Features for the details on the command format for each command.
- Example:
i/A00001 n/John Doe p/97328601 e/johndoe@example.com d/Marketing r/Manager s/5000.
- Press enter to execute the command.
-
add i/A00001 n/John Doe p/97328601 e/johndoe@example.com d/Marketing r/Manager s/5000is executed to add an employee namedJohn Doe.
-
Prefix summary
The prefixes are commonly used in commands such as add, edit, find, and sort.
The table below provides a summary on the corresponding prefix for each employee’s attribute.
The constraint for the attributes are listed in the table below. The constraint only applies
to the add and edit commands where the attribute value must fit the constraint for the command
to succeed.
| Prefix | Attribute | Constraint (only applies to add & edit commands) |
|---|---|---|
d/ |
Department | Alphanumeric characters and whitespaces only |
e/ |
Valid email address format | |
i/ |
Employee ID | Alphanumeric characters only |
n/ |
Name | Alphanumeric characters and whitespaces only |
p/ |
Phone | Numerical with at least 3 digits |
r/ |
Role | Alphanumeric characters and whitespaces only |
s/ |
Salary | Numerical value up to 2 decimal point, and up to one billion |
Features
![]() Notes about the command format:
Notes about the command format:
-
Words in
UPPER_CASEare the parameters to be supplied by the user.
e.g. inadd n/NAME,NAMEis a parameter which can be used asadd n/John Doe. -
Items in square brackets are optional.
e.g.find [i/ID] [n/NAME] [p/PHONE] [e/EMAIL] [d/DEPARTMENT] [r/ROLE] [s/SALARY_LOWER_BOUND - SALARY_UPPER_BOUND]can be used asfind n/John Doeor asfind n/John Doe d/finance. -
Parameters can be in any order.
e.g. if the command specifiesn/NAME p/PHONE_NUMBER,p/PHONE_NUMBER n/NAMEis also acceptable. -
Extraneous parameters for commands that do not take in parameters (such as
help,list,exitandclear) will be ignored.
e.g. if the command specifieshelp 123, it will be interpreted ashelp. -
If you are using a PDF version of this document, be careful when copying and pasting commands that span multiple lines as space characters surrounding line-breaks may be omitted when copied over to the application.
Viewing help : help
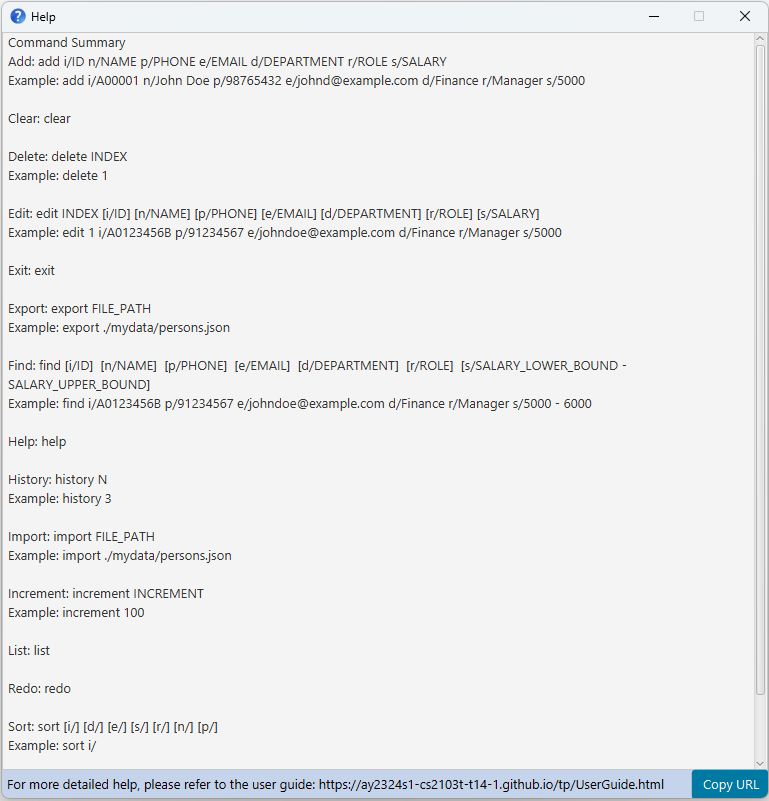
Shows a message explaining how to use the commands and where to look for more detailed help.
In cases where the help window is already open but minimized, executing the help command will not trigger a new window popup.
Format: help
Adding an employee: add
Adds an employee to EmployeeManager.
Format: add i/ID n/NAME p/PHONE e/EMAIL d/DEPARTMENT r/ROLE s/SALARY
- If there already exists an employee with a certain ID in EmployeeManager, adding another employee with the same ID will not be allowed.
Examples:
-
add i/A00001 n/John Doe p/97328601 e/johndoe@example.com d/Marketing r/Manager s/5000Adds an employeeJohn Doeinto the list. - Adding John Doe into EmployeeManager followed by executing
add i/A00001 n/Betsy Crowe p/82517642 e/betsycrowe@example.com d/Finance r/Intern s/1200.11will not add Betsy into the list.
Listing all employees : list
Shows a list of all employees in EmployeeManager.
Format: list
Editing an employee : edit
Edits an existing employee in EmployeeManager.
Format: edit INDEX [i/ID] [n/NAME] [p/PHONE] [e/EMAIL] [d/DEPARTMENT] [r/ROLE] [s/SALARY]
- Edits the employee at the specified
INDEX. The index refers to the index number shown in the displayed employee list. The index must be a positive integer 1, 2, 3, … - If there already exists an employee with a certain ID in EmployeeManager, editing another employee to the same ID will not be allowed.
- At least one of the optional fields must be provided.
- Existing values will be updated to the input values.
Examples:
-
edit 1 p/91234567 e/johndoe@example.comEdits the phone number and email address of the 1st employee to be91234567andjohndoe@example.comrespectively. -
edit 2 n/Betsy CrowerEdits the name of the 2nd person to beBetsy Crower.
Finding an employee by multiple attributes: find
Finds the employees that satisfy the find requirements based on multiple attributes.
Format: find [i/KEYWORD] [n/KEYWORD [OTHER KEYWORD]] [p/KEYWORD] [e/KEYWORD [OTHER KEYWORD]] [d/KEYWORD [OTHER KEYWORD]] [r/KEYWORD [OTHER KEYWORD]] [s/LOWERBOUND - UPPERBOUND]
- Find command must be used with at least one prefix and the keyword for the prefix must not be empty.
- Find command for all attributes are case-insensitive.
- Finds employees whose attributes satisfy all the search parameters.
Examples:
-
find i/A00 n/alex p/9001returns employees whose ID containsA00, name matches the wordalexand phone number contains9001.
Finding an employee by name: find n/
Find employees whose name matches at least one of the keywords in full.
Format: find n/KEYWORD [OTHER KEYWORD]
- The order of the keywords does not matter.
- Only full keywords will be matched.
- Employees whose name matches at least one keyword will be returned.
Examples:
-
find n/Johnreturn employees with namesjohnandJohn Doe. -
find n/alex davidreturns employees with namesAlex Yeoh,David Li.
Finding an employee by department: find d/
Find employees whose department matches at least one of the keywords in full.
Format: find d/KEYWORD [OTHER KEYWORD]
- Works the same as finding an employee by name.
Finding an employee by role: find r/
Find employees whose role matches at least one of the keywords in full.
Format: find r/KEYWORD [OTHER KEYWORD]
- Works the same as finding an employee by name.
Finding an employee by email: find e/
Find employees whose email contains at least one of the keywords.
Format: find e/KEYWORD [OTHER KEYWORD]
- The order of the keywords does not matter.
- Email will be matched if it contains a keyword.
- Email containing at least one keyword will be returned.
Examples:
-
find e/alex bernicereturns employees with emailsalexyeoh@example.com,bernicetan@example.com.
Finding an employee by ID: find i/
Finds employees whose ID contains the keyword.
Format: find i/KEYWORD
- The command will find employees whose ID contains the keyword.
Examples:
-
find i/A00returns employees with IDsA00,A00001anda0001.
Finding an employee by phone number: find p/
Find employees whose phone number contains the keyword.
Format: find p/KEYWORD
- Works the same as finding an employee by ID.
Finding an employee by salary: find s/
Finds employees whose salaries fall within the range of LOWERBOUND to UPPERBOUND inclusive of LOWERBOUND and UPPERBOUND.
Format: find s/LOWERBOUND - UPPERBOUND
- The LOWERBOUND cannot be larger than the UPPERBOUND.
- There must be a spacing before and after the dash
- LOWERBOUND and UPPERBOUND must be non-negative integers and cannot be larger than 1000000000.
Examples:
-
find s/1000 - 5000returns employees with salaries1000.00,4321.10,5000.00.
Deleting an employee : delete
Deletes the specified employee from EmployeeManager.
Format: delete INDEX
- Deletes the employee at the specified
INDEX. - The index refers to the index number shown in the displayed employee list.
- The index must be a positive integer 1, 2, 3, …
Examples:
-
listfollowed bydelete 2deletes the 2nd person in EmployeeManager. -
find n/Betsyfollowed bydelete 1deletes the 1st person in the results of thefindcommand.
Sorting displayed employees : sort
Sorts the displayed list based on the specified employee’s attribute in ascending order. EmployeeManager will automatically re-sort the displayed list based on the last specified attribute after any command that updates the data. This will ensure that the list remains sorted even after modifications.
Format: sort [i/] [d/] [e/] [s/] [r/] [n/] [p/]
- Exactly one of the prefix must be specified.
- The prefix specifies the attribute to be sorted with. Refer to the Prefix summary for help on the mapping of the attribute and prefix.
- Attributes are sorted by lexicographical order. For example, “Alice” comes before “Bob”,
and “10” comes before “20”. Keep in mind uppercase letters come before lowercase letters. For example,
Zcomes beforea. - Extraneous parameters entered after the prefix will be ignored.
- E.g.
sort s/123will sort by salary, the value123will be ignored. - E.g.
sort s/p/,p/is treated as a value and not a prefix. Since the valuep/is ignored, the command will sort by salary.
- E.g.
Examples:
-
sort i/sorts the list by ID. -
sort d/sorts the list by department. -
sort e/sorts the list by email. -
sort s/sorts the list by salary. -
sort r/sorts the list by role. -
sort n/sorts the list by name. -
sort p/sorts the list by phone.
Incrementing multiple employees’ salaries: increment
Increments the salaries of all employees in the displayed list in EmployeeManager by the given increment.
Format: increment INCREMENT
-
INCREMENTcan be positive or negative. -
INCREMENTis invalid ifINCREMENTcauses the salary of any employee in the displayed list to fall below 0 or exceed the maximum salary. Should this happen, an error message identifying the first employee whose adjusted salary falls outside the allowed range will be shown. -
INCREMENTcan have at most 2 decimals.
Examples:
-
increment 1000increments the salaries of all employees in the displayed list by1000. -
increment -100.65decrements the salaries of all employees in the displayed list by100.65.
Undoing a modification : undo
Restores EmployeeManager to the state before the last command that made a modification to the data in EmployeeManager.
Such commands include add, delete, edit, clear, increment and redo.
Format: undo
Examples:
-
clearfollowed byundorestores EmployeeManager to the state beforeclearwas executed. -
delete 3followed bysort n/followed byundorestores EmployeeManager to the state beforedelete 3was executed.
Redoing the previous undone command : redo
Restores EmployeeManager to the state before the last undo as long as no command that made a modification to the data in EmployeeManager was executed since the last undo.
Commands that change the data in EmployeeManager include add, delete, edit, clear, increment and undo.
Format: redo
Examples:
-
clearfollowed byundo, followed by addingJohnand thenredowill showNo more commands to redo!. -
delete 3followed byundofollowed byfind n/alex, thenredorestores EmployeeManager to the state afterdelete 3was executed.
Importing data : import
Imports an EmployeeManager data file into the application.
Format: import FILE_PATH
- Please refer to Specifying data file path for help on usage of
FILE_PATH. - The data file must be of
.jsonfile type. Otherwise, an error message will be shown. - The file path must be valid, and the application must have permission to read from the file.
- No changes will be made if the data file is invalid or not found.
Examples:
-
import ./persons.jsonimports thepersons.jsondata file from the same folder as EmployeeManager.
export command to save a copy of the current data.
GUI option
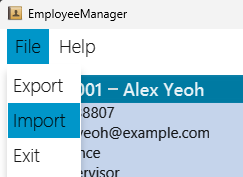
Alternatively, you may use the GUI option to import the data file if you are unfamiliar with file paths.
-
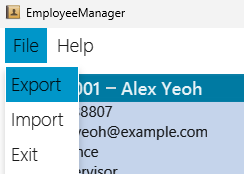
Click File > Import in the top left corner of the application.
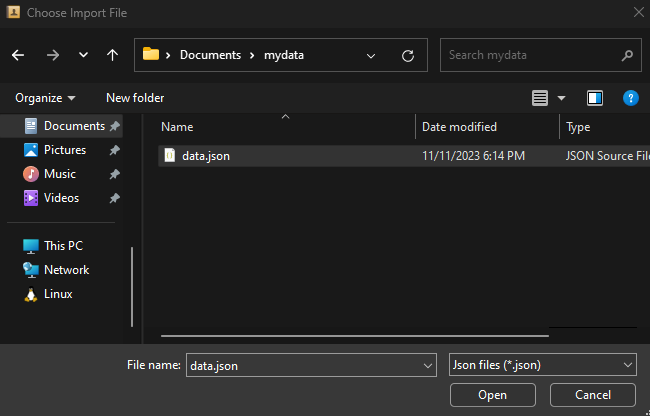
-
The file explorer will open and prompt you to select the data file. Only
.jsonfiles can be selected as that is the expected format of the data file. The file explorer will look different depending on your operating system.
-
After opening your data file, EmployeeManager will attempt to load the data into the application.
Exporting data : export
Exports the data file in EmployeeManager to the specified path.
Format: export FILE_PATH
- Please refer to Specifying data file path for help on usage of
FILE_PATH. - The data file must be of
.jsonfile type. Otherwise, an error message will be shown. - The file path must be valid, and the application must have permission to save to the file path.
- Depending on your system and user permission, you might not be allowed to save to certain folders such as
C:\Windows. EmployeeManager will show an error message in such scenarios.
Examples:
-
export ./data.jsonwill create the data file in the same folder as EmployeeManager.
GUI option
Alternatively, you may use the GUI option to export the data file if you are unfamiliar with file paths.
-
Click File > Export in the top left corner of the application.
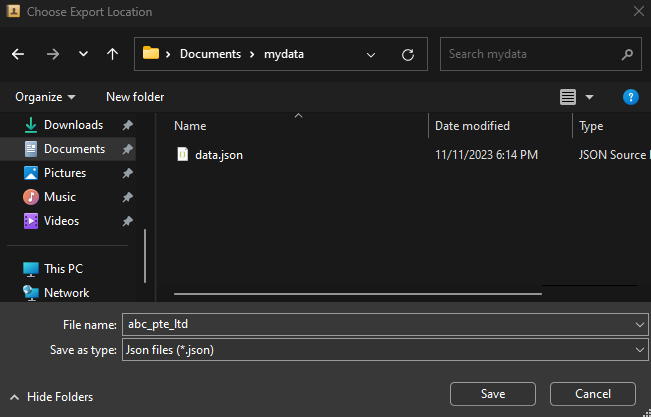
-
The file explorer will open and prompt you to save the data file. The file explorer will look different depending on your operating system.
-
After selecting your save location, EmployeeManager will attempt to save the data into the specified location.
- The file explorer will save the file as a
.jsonfile format. - The data file can be given any valid name, e.g.
abc_pte_ltd.jsonas shown in the image above. - Valid file name is dependent on the operating system.
- The file explorer will save the file as a
Viewing command history : history
Displays up to the last N valid user commands that have been executed, starting from the previous command.
If the number of valid user commands is less than N, it shows all valid user commands that have been executed.
Do note that history will only show you the executed commands for this session - it resets each time you close and relaunch EmployeeManager.
Format: history N
- N specifies the number of most recent valid commands to be displayed, not inclusive of the current
historycommand. - N must be a positive integer that is less than or equal to 1000.
Examples:
-
history 5displays up to the last 5 valid user commands. -
history 1displays the most recent valid user command. -
history 10displays up to the last 10 valid user commands. If fewer than 10 commands have been executed, all available commands are shown.
Clearing multiple employees’ data : clear
Clears the current displayed list of entries from EmployeeManager.
Format: clear
Exiting the program : exit
Exits the program.
Format: exit
Specifying data file path
The data file path used in export and import command must refer to a .json file. The extension .json is
also case-sensitive. Valid file paths also depends on the operating system (OS). Listed below are
examples of different file path formats and their result.
| Path | Description |
|---|---|
data.json |
The file data.json in the same directory where EmployeeManager.jar is located in. |
/Documents/data.json |
The slash / at the front represent an absolute file path from root of the current drive. E.g. It might point to C:/Documents/data.json in Windows. |
Documents/data.json |
With no slash / at the front, it is a relative path from the directory where EmployeeManager.jar is located in. |
./data.json |
A dot . at the front is also a relative path from the directory where EmployeeManager.jar is located in. |
- Valid files names can consist only of the extension without a name e.g.
.json. On most systems, the file will be treated as a hidden file and only visible by changing settings. It is thus not recommended to export data file without a name.
Saving the data
EmployeeManager data are saved in the hard disk automatically after any command that changes the data. There is no need to save manually.
Editing the data file
EmployeeManager automatically saves your data as a JSON file [JAR file location]/data/employeemanager.json.
For advanced users, you have the option to directly modify this data file to update records.
After editing, simply restart EmployeeManager to view the updated changes.
FAQ
Q1: How do I transfer my data to another computer?
A: Install the app in the other computer and replace the default data file it creates with the data file of your previous EmployeeManager.
Q2: Are the employees listed in the order of id or name?
A: No, the employees are not listed in any explicit order. Newly added employees will be placed at the end of the list.
Known issues
-
When using multiple screens, if you move the application to a secondary screen, and later switch to using only the primary screen, the GUI will open off-screen. The remedy is to delete the
preferences.jsonfile created by the application before running the application again.
Command summary
| Action | Format, Examples |
|---|---|
| Add |
add i/ID n/NAME p/PHONE e/EMAIL d/DEPARTMENT r/ROLE s/SALARY e.g., add i/A00001 n/John Doe p/97328601 e/johndoe@example.com d/Marketing r/Manager s/5000
|
| Clear | clear |
| Delete |
delete INDEXe.g., delete 2
|
| Edit |
edit INDEX [i/ID] [n/NAME] [p/PHONE] [e/EMAIL] [d/DEPARTMENT] [r/ROLE] [s/SALARY]e.g., edit 1 p/91234567 e/johndoe@example.com, edit 2 n/Betsy Crower
|
| Exit | exit |
| Export |
export FILE_PATHe.g., export ./data.json
|
| Find |
find [i/KEYWORD] [n/KEYWORD [OTHER KEYWORD]] [p/KEYWORD] [e/KEYWORD [OTHER KEYWORD]] [d/KEYWORD [OTHER KEYWORD]] [r/KEYWORD [OTHER KEYWORD]] [s/LOWERBOUND - UPPERBOUND]e.g., find n/John, find i/A00 p/9001, find r/executive manager
|
| History |
history Ne.g., history 2
|
| Increment |
increment INCREMENTe.g., increment 1000, increment -100.65
|
| Import |
import FILE_PATHe.g., import ./data.json
|
| List | list |
| Redo | redo |
| Sort |
sort [i/] [d/] [e/] [s/] [r/] [n/] [p/]e.g., sort i/, sort n/, sort p/
|
| Undo | undo |
Glossary table
| Term | Description |
|---|---|
| CLI | Stands for Command Line Interface and it is a means of interacting with a computer program by inputting lines of text called command-lines. |
| GUI | Stands for Graphical User Interface and it uses icons, menus and a mouse (to click on the icon or pull down the menus) to manage interaction with the system. |
| File Path | A file path is the location of a file or folder in a computer’s file system. It specifies where a file is located on the computer. |
| Working Directory | The working directory is the folder in which the user is currently operating in the command line. |